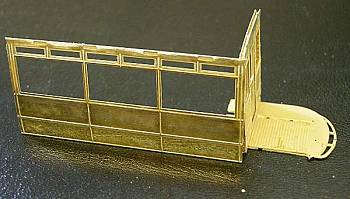
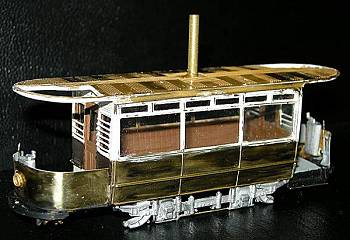
The Cornell "Preston Car" etched brass kit (above) and its instructions (below)
|
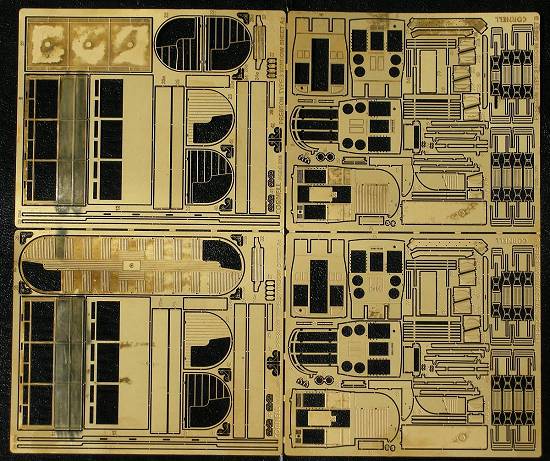
The Flat-Pack Tram Kit A Look at Brass By John Prentice |
Over recent years much has been written about how the model railway world has raised its standards, but that the model tramway fraternity has not kept pace. One of the great railway modeller advances has been the use of etched brass kits. Here it is possible to achieve some very fine results. Chris Cornell, a TLRS member, has produced a good range of etched brass tram kits, including his superb London E/3 and HR/2 models, but the take up of the use of such kits has been quite modest. It seems that some tramway modellers find the thought of etched brass as being too difficult or perhaps too expensive.
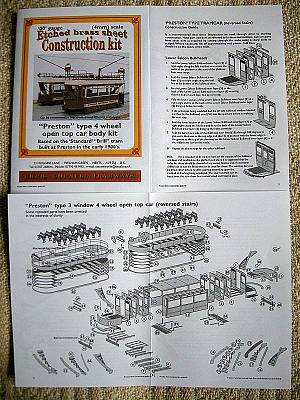
For some years Chris has made a Preston type open-top, three window, 4 -wheel car in 0 gauge, but he has recently released it in 00 as well (available from TLRS On-line Sales). For a modest £32, this kit provides a useful model for most layouts and is not too difficult to make, so here I will take a look at how one is constructed. As with all forms of model tram building, there are many ways to construct a brass kit. I do not claim that what follows is the best, the quickest, the easiest, or the only way, but as Ole Blue Eyes said "I did it my way".
The Preston car (or its equivalent from other manufacturers) was common on many British tramways. Before you start construction of this, or indeed any tram model, you should get one or two good pictures of your chosen prototype, as there were a number of variations between systems.
The first thing with a brass kit is to think how we are going to put it together. Chris prefers the use of soldering, but I know many modellers are unhappy with the "hot stick" so here I have kept its use to a minimum. Other possibilities are two-part epoxy (Araldite etc.) and instant glue (Superglue). In the past I have usually soldered the main body parts together to provide the necessary structural strength, but for such a small model in 00 scale it isn't really necessary, so this time I have used epoxy for joining the sides to ends and a few other parts where strength is required and elsewhere have used instant glue, only soldering the handrails. If you are going to solder the body you need a fairly large iron, say 40 watt, as the larger brass parts will quickly conduct the heat away.
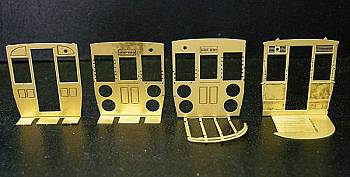
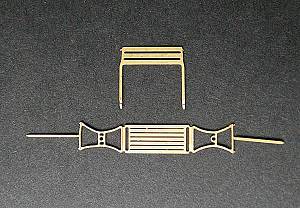
An end in four sections (above), assembled (right) and the sides (below) |

|
With the "instant" you can use it in much the same way as you would with solvent welds for plastic, i.e. put the parts together, put it a trace along the joint and let it run in, and then press together for a few seconds. Another good tip is that it goes off even quicker when wet (spit on it), although then goes opaque. Don't worry too much about sticking your fingers together, they do come apart again. If you get glue on the model's surface where you do not want it, wipe it off at once with a piece of tissue or kitchen roll. Once dry I remove unwanted instant glue with a small wire brush in a rotary tool (Dremel). At high speed it will slowly polish away the glue without damaging the details on the brass.
Each etch has all the part numbers on it and these match those in the instructions. The parts can be "nipped" out with the point of a craft knife. Do not cut them out before you actually need them as not only are some very small and will get lost, but also once removed you will lose track of their numbers. You will need to smooth off any tags that are left on the part with a small Swiss file.
 A side and end assembled (above) and the lower deck, part assembled (left)
Chris's kits only contain the etched brass frets. Other materials have to be added. For the Preston kit you will need to add glazing material, 0.4mm brass wire for handrails etc., and 2mm brass tube for the trolley mast. There are no wheels and you may want at add a motorising unit. Certainly you need cast white metal sideframes. Suitable types are available from ABS Models. I sometimes make up controllers from plastic, but you may wish to buy a cast white metal pair.
With Chris's kits he tends to use a laminated system to build up thicker part and to apply surface detail. In this kit each side is made up of an inside and outside part and each end consists of four layers. Here the instant glue is most useful for joining the layers. Follow Chris's instructions in the order given and you won't go wrong. Once you have the two sides and two ends they can be joined together with epoxy. Make sure that it is square.
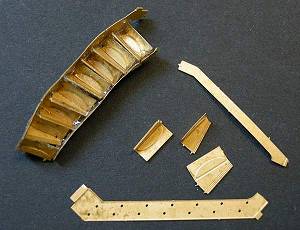
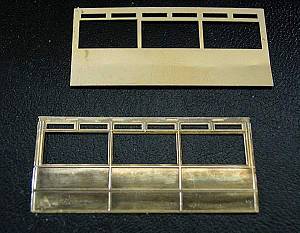
Staircases in parts (above) and compared with a white metal one (right) |
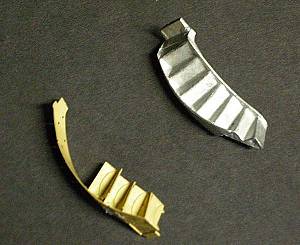
|
The platforms, dashes, staircases, steps and minor platform fittings should be added at this stage, as it is easier to do before you fit the top deck. The kit provides a three bar lifeguard gate. Check your prototype as some operators used a two bar gate, in which case cut one bar off. With the Preston car Chris supplies all the step parts to build up the staircase, but to be honest they are a bit fiddly. ABS Models make a nice pair of cast white metal staircases which you could use instead.
 The lower deck completed (right)
The upper-deck floor (lower-deck ceiling) is also built up in layers. Use a similar technique as for the sides. Both the curve of this part and the tumblehome on the sides has to be shaped before assembly. As each separate part is very thin, this can easily be done with the fingers. Two ventilator strip parts are fitted around the edge of the upper-deck floor which makes this assembly into what Chris compares to the lid of a biscuit tin, it fitting over the lower deck. The kit provides for two types of ventilator strip, one of which is fitted with individual ventilator scoops according to prototype. I fixed the upper deck to the lower with epoxy. The kit provides all the garden seats for the upper deck. They are simply made by bending up from the two parts provided. I prefer to paint the seats before fixing them to the floor.
The seats (above & right) |

|
All the railings and handrails are made up from 0.4 mm bass wire, which I have chosen to solder together. The upper deck railings on the prototype may or may not have wire mesh fixed to them. This is not included in the kit, so if you need mesh, you will have to get it elsewhere. I sometimes use a very fine nylon mesh for such models. There are two types of upper-deck sides supplied, a deep one and a shallow one, again check your prototype. Blind boxes are provided, but you may prefer to use others to suit your prototype.
Now we move to the finishing of the model. There are many differing views here. Chris always spray paints his models, I use a brush. But there is nothing unique to the finishing of your brass kit. It is exactly the same as finishing a white metal or plastic kit. Use whatever is your favourite method. Paint will easily peel from etched brass so before you begin painting make sure the model is clean and free from grease (or if you have used solder, flux). As with any model, paint any interior parts and fit glazing before you fix the roof/upper-deck on.
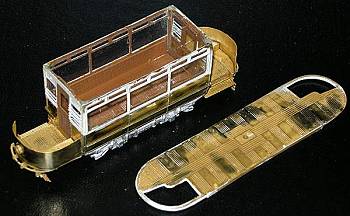
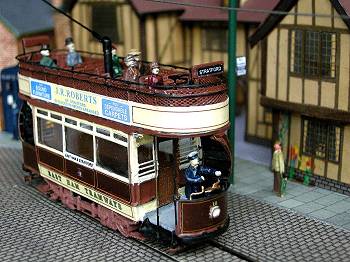
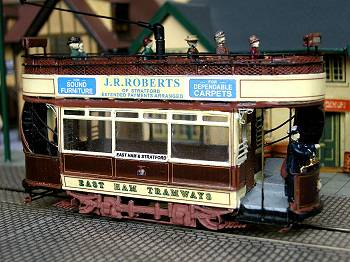 The kit made up as an East Ham car (above & right)
Working with etched brass is not easy, but neither is it very difficult. There are lots of parts and they are small, so you will take longer to produce your model than you would with card, white metal or plastic, but less time than you would to scratch-build. As with all things in life, if it is too easy it is probably not worth doing. Have a go with one of these Preston cars and you will be surprised at the enjoyment you will get out of completing such a nice model. Then maybe go on to tackle one of those E/3s or HR/2s that you have always wanted. Chris Cornell tells me that if sales of the Preston model are satisfactory, then he is considering doing a covered-top open balcony version, the Brush equivalent of the Preston 4-wheeler, and a narrow gauge open-topper.
I hope these notes have tempted some of you into trying etched brass modelling. It is perhaps the time to try something different. This in turn will encourage Chris and possibly others to produce more new kits.
![]() Return to Tramway Modelling On-line Reference
Return to Tramway Modelling On-line Reference